Javascript设计模式简介

设计模式能帮组我们解决很多软件设计上常见的问题。下面介绍两种Javascript中常用的设计模式,他们十分类似但也有不同。注意,设计模式并不限于某种语言。

观察者模式

在这个模式中,有一个叫目标的东西,它维护这一个依赖于它的观察者列表,当特定的事情发生时,目标会通知在它的观察者列表中的所有观察者。如果某个观察者想接收某个目标的通知,该目标就讲这个观察者添加到自己的观察者列表,如果不再想接收该目标的通知,该目标就可以从自己的观察者列表中移除这个通知。下面展示一个示意图:

image

解释一下里面的名词:

  1. Subject-目标
    • 具体目标的基类
    • 维护一个观察者列表
    • 维护一些用于添加、删除、通知观察者的方法
  2. Observer-观察者
    • 具体观察者的基类
    • 提供更新接口,供目标调用
  3. ConcreteSubject-具体目标
    • 继承目标类
    • 当状态改变时通知自己的观察者(即调度观察者的更新方法)
  4. ConcreteObserver-具体观察者
    • 继承观察者类
    • 把自己注册到具体目标中
    • 实现自己的更新接口(更新方法)

这本书中讲到了一个例子,我觉得很好的展示了观察者模式,下面主要讲讲这个例子:

这个例子大概就是,有一个按钮用于添加checkbox,有一个container用于装添加的checkbox,有一个checkbox(旧checkbox)用来控制其他新添加checkbox的状态。

新添加的checkbox们就是具体观察者,他们的更新接口(方法)就是一个update函数,函数所做的事就是将具体观察者们的checked属性置为跟旧checkbox的一样。

旧checkbox就是具体目标,点击它会修改自己的checked属性(默认行为),同时会notify他的具体观察者,即调用他们的更新接口

点击按钮就会创建一个新的checkbox并添加到container内,同时会调用具体目标的添加观察者方法

步骤如下:

  1. 首先有一个观察者列表的类,方便目标维护一个观察者列表
  2. 构建目标类,主要就是添加一些用于添加、删除、通知观察者(即调用观察者更新接口)的方法
  3. 构建观察者类,实现一个默认更新接口,这个接口可以被具体观察者的实现覆盖
  4. 写html
  5. 获取dom
  6. 创建具体目标:旧checkbox的dom对象继承目标类
  7. 给具体目标添加点击事件,点击的时候调用具体目标的notify方法
  8. 给按钮添加点击事件,点击的时候新建一个checkbox的dom对象,给对象继承观察者类(构建具体观察者),实现具体观察者的update方法,调用具体目标的添加方法,将具体观察者添加进去,将新checkbox dom对象添加到container
  9. 在这个例子中首先定义了一个ObserverList类,用于维护一个观察者列表。

为什么观察者模式里面要额外维护一个观察者列表?

  • 答:实际开发中一般在观察者列表和目标之间会有一个中间层负责调度,例如控制一下谁能够添加到观察者列表中,可以做权限管理和控制
  • 而观察者列表可以做得十分通用,十分简单
1
2
3
4
5
6
7
8
9
10
11
12
13
14
15
16
17
18
19
20
21
22
23
24
25
26
27
28
29
30
31
32
33
34
function ObserverList(){
this.observerList = [];
}
ObserverList.prototype.add = function( obj ){
return this.observerList.push( obj );
};
ObserverList.prototype.count = function(){
return this.observerList.length;
};
ObserverList.prototype.get = function( index ){
if( index > -1 && index < this.observerList.length ){
return this.observerList[ index ];
}
};
ObserverList.prototype.indexOf = function( obj, startIndex ){
var i = startIndex;
while( i < this.observerList.length ){
if( this.observerList[i] === obj ){
return i;
}
i++;
}
return -1;
};
ObserverList.prototype.removeAt = function( index ){
this.observerList.splice( index, 1 );
};

可以思考一下为什么要有get、indexOf等貌似多次一举的方法,为什么不直接用数组方法?

  • 答:因为有可能不是一个数组,这时候是没法直接用下标或者别的什么方式获取的。通过实现get接口,使用者可以完全不需要关心内部实现,不需要知道内部是数组还是对象什么的。其实这就是一个高内聚的特点,就是一个彻底地封装

接着我们定义一个目标(subject)类,里面维护一个刚刚定义的ObserverList的实例

1
2
3
4
5
6
7
8
9
10
11
12
13
14
15
16
17
18
function Subject(){
this.observers = new ObserverList();
}
Subject.prototype.addObserver = function( observer ){
this.observers.add( observer );
};
Subject.prototype.removeObserver = function( observer ){
this.observers.removeAt( this.observers.indexOf( observer, 0 ) );
};
Subject.prototype.notify = function( context ){
var observerCount = this.observers.count();
for(var i=0; i < observerCount; i++){
this.observers.get(i).update( context );
}
};

可以看到目标类的作用主要就是三个:

  1. 添加观察者
  2. 移除观察者
  3. 通知观察者(即调用观察者列表里面所有观察者的更新(update)方法

接下来定义观察者类,注意这只是一个框架,里面的update方法可以在后来被覆盖。

1
2
3
4
5
6
// The Observer
function Observer(){
this.update = function(){
// ...
};
}

三个类写好之后,下面我们来看看如何使用。首先我们的html是这样的:

1
2
3
<div class="observerContainer"></div>
<input type="checkbox" name="subjectCheckbox" class="subjectCheckbox">
<button class="addObserverBtn">click here to add a observer</button>

然后是我们的js代码,我们额外定义了一个extend函数方便我们合并实例:

1
2
3
4
5
6
7
8
9
10
11
12
13
14
15
16
17
18
19
20
21
22
23
24
25
26
27
28
function extend(target, extension){
for(var key in extension){
target[key] = extension[key];
}
}
var addBtn = document.querySelector(".addObserverBtn"),
container = document.querySelector(".observerContainer"),
mainCheckbox= document.querySelector(".subjectCheckbox");
extend(mainCheckbox, new Subject());
mainCheckbox.addEventListener("click",function(){
mainCheckbox.notify(mainCheckbox.checked);
})
addBtn.addEventListener('click',function(){
let checkbox = document.createElement("input");
checkbox.type = "checkbox";
extend(checkbox, new Observer());
checkbox.update = function(value){
this.checked = value;
}
mainCheckbox.addObserver(checkbox);
container.appendChild(checkbox);
})

subjectCheckbox是我们的具体目标,点击subjectCheckbox会改变自己的checked属性,同时会调用具体目标的通知方法,即调用调用具体目标的观察者列表中的所有观察者的update方法,并把checked属性的值作为参数传进去。

而在这里checkbox就是我们的具体观察者,他的update方法就是根据传进来的参数修改自己的checked属性。

点击addBtn会创建一个checkbox,并调用具体目标的添加观察者方法将checkbox添加进具体目标的观察者列表里。

在这个例子中我们没有使用移除观察者的方法。

发布/订阅模式(Publish/Subscribe Pattern)

image

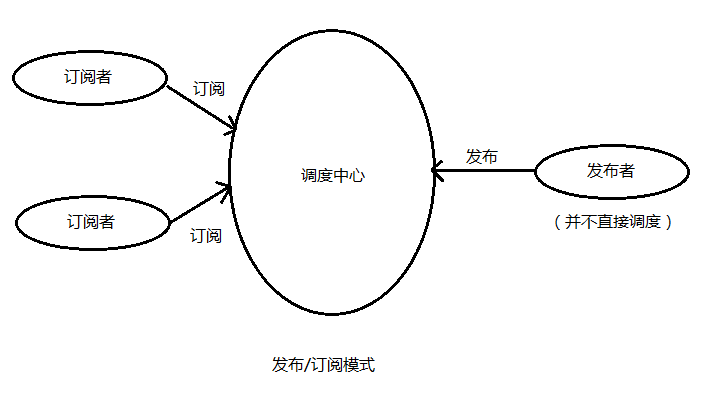
比较概念的解释是,订阅者把自己想订阅的事件注册到调度中心,当该事件触发时候,发布者发布该事件到调度中心(顺带上下文),由调度中心统一调度订阅者注册到调度中心的处理代码。

我的理解中,其实比较类似js中的事件。在js中引擎就是调度中心,我们给某个对象添加事件就是将事件处理程序注册到调度中心,这里对象就是订阅者。事件发生的时候其实就是发起事件者给调度中心发布,这里的发起事件者就是发布者。调度中心指导之后就统一掉用注册到调度各个事件处理程序。

在这个过程中发布者不需要直达订阅者是谁、长什么样,订阅者也不需要指导发布者是谁、长什么样。这就是发布/订阅模式的特点:

与观察者模式的区别

两者最大的区别就是调度方式,

虽然两种模式都存在订阅者和发布者(具体观察者可认为是订阅者、具体目标可认为是发布者),但是观察者模式是由具体目标调度的,而发布/订阅模式是统一由调度中心调的,所以观察者模式的订阅者与发布者之间是存在依赖的,而发布/订阅模式则不会。

这里引用一篇关于二者区别的文章的内容,摘自这本书

The Observer pattern requires that the observer (or object) wishing to receive topic notifications must subscribe this interest to the object firing the event (the subject).

The Publish/Subscribe pattern however uses a topic/event channel which sits between the objects wishing to receive notifications (subscribers) and the object firing the event (the publisher). This event system allows code to define application specific events which can pass custom arguments containing values needed by the subscriber. The idea here is to avoid dependencies between the subscriber and publisher.

This differs from the Observer pattern as it allows any subscriber implementing an appropriate event handler to register for and receive topic notifications broadcast by the publisher.

这文章里面有一个描述发布/订阅模式的例子,可以参考一下。注意里面的publish、subscribe、unsubscribe方法的实习都没有写出来。

这个例子很好的体现出发布/订阅模式的优点:允许订阅者实现一个特定的适合于自己的事件处理函数

1
2
3
4
5
6
7
8
9
10
11
12
13
14
15
16
17
18
19
20
21
22
23
24
25
26
27
28
29
30
31
32
33
34
35
36
37
38
39
40
41
42
// A very simple new mail handler
// A count of the number of messages received
var mailCounter = 0;
// Initialize subscribers that will listen out for a topic
// with the name "inbox/newMessage".
// Render a preview of new messages
var subscriber1 = subscribe( "inbox/newMessage", function( topic, data ) {
// Log the topic for debugging purposes
console.log( "A new message was received: ", topic );
// Use the data that was passed from our subject
// to display a message preview to the user
$( ".messageSender" ).html( data.sender );
$( ".messagePreview" ).html( data.body );
});
// Here's another subscriber using the same data to perform
// a different task.
// Update the counter displaying the number of new
// messages received via the publisher
var subscriber2 = subscribe( "inbox/newMessage", function( topic, data ) {
$('.newMessageCounter').html( ++mailCounter );
});
publish( "inbox/newMessage", [{
sender: "hello@google.com",
body: "Hey there! How are you doing today?"
}]);
// We could then at a later point unsubscribe our subscribers
// from receiving any new topic notifications as follows:
// unsubscribe( subscriber1 );
// unsubscribe( subscriber2 );

参考